Saturday, January 28, 2012

New and Improved Sucker Holders!


These sucker holders are a step up from my earlier post, and are very easy to make!


I used the Two Tags die cut for the Big Shot but folded the paper before I ran it through.  This way I made one long tag with two scalloped ends.  This improved version has different folds so it stands up much better.  Below is a short tutorial on how I made these. 
(I apologize in advance for the dark photos.)


Fold a piece of cardstock 8 1/2" by 2 1/4" in half.  Using the Two Tags die cut, place the cardstock's fold about 1/4" inside the bottom end of the small tag.  This way the end does NOT get cut.


The open end of the cardstock should be on the scallops.  Run through the Big Shot.


It should look like this.


Score and fold 1 3/4" to the left of Center Fold as shown.  Then score and fold 2 1/4" to the right of Center Fold.


Punch a hole in the center of the fold to the right as shown above.


Insert sucker stick through hole. Fold top scallop down first and then fold bottom scallop up.


Adhere with dimensionals.


Punch a scallop circle from designer paper. 
Add to holder, layering just below the holder's scallops as shown.


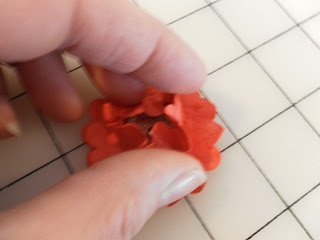
Create scalloped circle vintage flower by crushing layers of the scalloped circle as shown below.  (see my Jan. 15th post for information on creating these flowers and matching purse.)


Add the distressed vintage flower using dimentional.


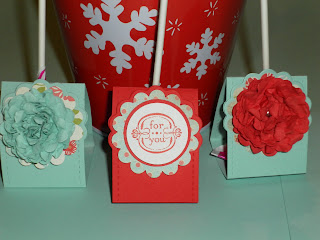
A simple scalloped piece of designer paper layered with a greeting can be used instead of a vintage flower. Below I used the scallop punch, 1 3/8" circle punch and a 1" punch. 


The greeting "for you" is from Elements of Style and the DSP is Everyday Elegance from Sale-a-bration; both from Stampin' Up!   Dimensionals can be used in between layers to add height.


The completed holders.


Now that you've seen how it's done - give it a try!  These would make wonderful valentine treats!

Sunday, January 22, 2012

Poppy Parade Vintage Purse

These purses are so fun to make!  Here's another one made with Poppy Parade cardstock.  The DSP is Everyday Elegance from the Sale-a-Bration mini.


The inside is a simple box in between the two outside panels.  


If you are interested in step-by-step directions scroll down for more information on the tutorial that is available.

All Matchy-Matchy!

Here is what we are making at Stamp Club tomorrow night!


It's a card and 2 treats that are all Matchy-Matchy.  I started out with the intention of doing something for Valentine's day that maybe had non-traditional colors.  This is certainly non-traditional for V-day.  I used Pool Party CS and Stampin' Up's Everyday Elegance DSP from the Sale-a-Bration mini.  The flowers are made from the scalloped circle punch and the Fun Flowers die cut for the Big Shot.


 The fancy edge on the card is cut with the new edgelits from the Occasion mini and the matching embossing folder.


This little treat has a peppermint patty in it.  The DSP slides right off since the ribbon is around just the DSP instead of the candy.  This was inspired by Inking Idaho, I just used different colors and put a flower on top.

Top view of the sucker holder.  I used the Two Tags die cut but folded a strip of cardstock on one end so it was a longer piece with two scalloped ends.  I made two folds in the middle so it was flat on the bottom and would hold the sucker upright.  Not sure I like this or not but I needed to put it in something that matched the rest of the pieces in this set.  : )


On the top I just punched a hole through the flower layers and threaded the stick through the base and then the flowers. 


Sunday, January 15, 2012

Vintage Purse!


I love the new edgelits from the Stampin' Up! Occasions Mini Catalog and am so excited to share my latest creation with you!  I made a couple cards using the Adorning Edgelit and then decided to try something different ..... like a purse.   This is what I came up with.  Then I made a few more : 0


Usually, I end up CASEing someone else's idea and maybe making a few changes, but I can actually say this is my original design.  I have not seen the edgelit used on a purse like this yet.  I used Pool Party and Poppy Parade Cardstock along with the new Everyday Enchantment DSP from the Sale-a-Bration mini on this one.  I LOVE this DSP, it has a very vintage feel to it!

For those of you who are interested, I have written a 17 page step-by-step tutorial with LOTS of photos, easy to read instructions, and a few tips and tricks along the way.  Click on the 'Buy Now' button to purchase this tutorial through PayPal for $2.95.  It will be emailed to you as a PDF document and includes all directions for the Vintage Purse and matching 3x3 mini cards and envelopes as seen below.

Sunday, January 8, 2012

It's a Penguin!

Here is a little penguin I CASED from someone on the SU website.


I used many different punches on this one!  The body is the 1 3/4"  and 2 1/2" circle punch, the face is part of the 2 1/2" punch (black) and the large oval in white.  His little flippers are the small oval punch and feet are the modern label punch.  His hat is the ornament punch and trim is cut from the large oval, both pieces plus his ear muffs are embossed. Almost forgot his eyes - they are from the Itty Bitty punch pack and I punched them a second time to take off the bottom part to get the crescent shape.  The little guy is adhered to a top note. 

Monday, January 2, 2012

Stamping Stampede Christmas Party


I'm finally getting around to posting some pix of our Christmas Party!  It's a yearly event where we eat, do a quick project, and play the Dice game for prizes.  It can get a little wild and crazy!!


Here's a group picture of the members who were able to attend that night.  We had multiple scheduling conflicts so we only had about half of our club.  Poor Stephanie even left early before our picture because she was sick. 

 Always have to be some jokesters.


Love this little Santa hat that LaReatha was sporting!

Vanna, I mean Rhea, was displaying the paper Clutch she won containing a Stampin' Up! gift certificate.