Sunday, November 4, 2012

Christmas Stamp-A-Stack

Here are the cards and matching gift bag we will be making at my
Stamp-A-Stack on November 17th. 


 We will be creating a collection of 20 cards (5 each of 4 designs) featuring the Scentsational Season stamp set and matching framelits to cut out each image as shown below. 


Closer photo of the Snow Flurry, Ornament, and Joy cards. 
We will make 5 of each of these.
  
 
The ornaments on the Baja Breeze card and hand-made ornament on the gift bag are made from the Ornament Keepsakes Stamp Set and Holiday Ornaments framelits.

 
The snowflake card uses the SnowFlurry die cut.  Check out the center!
 

These ribbon layers on the Joy card seem to be all the rage lately.
 

A closer look at the ornament on the gift bag. I think I will be making a few more of these for gifts. I've seen them attached to wine bottles too! If you look on SplitCoastStampers you will see tons of these. However, this is a very EASY version with just 5 flat ornament images in the background instead of the 4 sided ones with 2 layers and a rosette in the middle.

 
 This design can be made pretty quickly, just attach the stamped ornaments to a center circle, add pieces of tulle, the snowflake and a bronze button to top it off! 


StoryBook Friends!

I LOVE little 3x3 cards - and - matching envelopes. 
This stamp set is sooo sweet I thought it would make a nice little set for someone. 
My mother-in-law had surgery recently so I made a set for her.


 Here's a closer look at the cute little animals.


 I used the blender pen with a little ink to add some color. 
With these designs less is more as far as color.


I used Stampin' Up's Simply Scored tool to make the
matching envelopes out of Designer Series Paper.


Tie them all together with a ribbon and it's a perfect little gift!
 

Ribbon Share

A few weeks ago, I offered a Ribbon Share from Stampin' Up! that included 15 different colors and types of ribbon.  This is an excellent way to get a nice variety without having to buy a full spool of each one. 


Each spool was divided into 5 equal shares and I wrapped them around a piece of white cardboard that I had put through an embossing folder and then stamped on the top.  The linen thread at the top is part of the share too.


Sunday, September 23, 2012

Halloween Purses!

Here are some Halloween purses I CASED from the Stampin' Success Magazine. They use the Petite Purse die cut for the Big Shot and were designed by Missi Roeber. So cute!

I had kind of overlooked these - saw them and thought they were cute, but then a Club member got really excited over them and wanted to make some. She had some questions as to how they were put together so I decided to make a set to figure it out. Sure glad I did - they are quick and easy to put together AND they are soooo fun!

The bat is my favorite. It uses the 1/2" and 3/4" circle punches for the eyes, and the extra large oval for the wings. I cut the 'scallops' of the wings out with the 1" punch. Also, the purse itself is embossed with the Spider Web Embossing Folder.

The pumpkin purse is Pumpkin Pie cardstock embossed with the Stripes Embossing folder. Pretty easy - cut triangles for nose and eyes and cut the large oval in half lengthwise for the mouth and snip out some 'teeth'. The stem is Old Olive embossed with the Square Lattice Folder and I added some curly Q's with a thin strip of cardstock shaped by wrapping around a toothpick.

Frankenstein is embossed with the Lattice Square Embossing Folder and the edges are sponged with basic black ink. Next time I make Frankie I will not emboss it because it's such a condensed pattern it makes the purse kind of floppy and difficult to work with. Frank's hair piece is just cut out of Basic black cardstock and adhered to the purse flap. You may want to cut part of the purse flap shorter so the hair doesn't hang too low and cover up his eyes. Leave the tab in place if you cut part of the purse flap so you can close it.
This bag is made from the Halloween Ghoulish Googlies Designer Kit from Stampin' Up's Holiday Catalog. I embossed the cute little glassine bag with the Spider Web Embossing Folder and used the Apothecary Accents framelits to cut a background layer for the tag. Kind of looks like a headstone or tombstone, dont' you think?

Family Wedding Photos


Ben and Sam. (I know, Ben looks possessed - oh, well the rest of the picture is nice!)They were happy they didn't have to wear shirts and ties. : ) These aren't stamping-related photos but I couldn't resist.

The whole family.

My parents - all dressed up!

More Wedding Bells!

My nephew recently got married. The bride and groom had a fall theme with the typical fall colors so I made a wedding card similar to my earlier card I posted but with different colors. I used Cajun Craze with Basic Black cardstock.


The bride's dress is embossed with the Fancy Fan embossing folder and the background behind the greeting was made with the Apothecary Accents framelits. The envelope flap is also embossing with the Fancy Fan folder to match.


Monday, September 3, 2012

Greeting Card Kids go to School!

 
I thought these were timely now that we're all back in school!  I had a couple of gifts that I needed to dress up a little so I used an aqua painter and colored in these kids from the Greeting Card Kids stamp set. 


The outside shapes are layered and cut using 2 Labels Collection Framelits, one in whisper white and one in Marina Mist cardstock.  Love these kids!

Purses and Bracelets!

Here are some cute little purses made with the Petite Purse die cut and matching bracelets.  I followed the tutorial written by Erika Clark at inkiepinkies.blogspot.com to create these.  She has the instructions on her blog if you are interested. 


The bracelets are made from rolled designer series paper.  I used Floral District and some other retired paper I had on hand.  The DSP is cut into long strips (1/2" by 12"), rolled to the narrow point and then coated with Crystal Effects.  After the beads dry, I threaded them on elastic cording, tied a knot, and added a ribbon. 

 
The bracelets fit in the purse for a fun little gift.


I gave away all of these sets, now I need to make one for myself!


Holy Waterbottles, Batman!

 
Here are the many water bottles that Stephanie and Jill decorated for our last Stamp Club get-together in July!  Each one is unique and different - they said they had a lot of fun making these!  Each holder on the bottles have a drink mix in the pocket.  They are super cute - lots of details too, if you look closely!  Thanks you two!!

Saturday, September 1, 2012

Volunteer of the Year!

This post isn't stamping related but I wanted to give some kudos to someone very special to me. 

My mom was recently awarded the distinction of being Polk County's Volunteer of the Year!  This is given to a person who has been nominated by others in their community for outstanding volunteer contributions.

 
My Mom has volunteered for many things such as Meals on Wheels, numerous occasions for church and has spearheaded and organized the thrift shop at the Embassy in Fosston.  This undertaking includes collecting donations of clothes and household items and selling them at a twice monthly rummage sale at the Embassy.  The proceeds go to hold events there such as bands to play for dances and Bingo.

Below is a photo of Mom, Dad, me, and Arlen (one of my older brothers) after she received her award at the Fertile Fair.  This picture was taken only a week before my Dad was hospitalized in Rochester.
 
 
My son Ben was also there.
 
 
Last week Mom even got to be in a parade in Crookston because of her award. 
This was really exciting for her and us!  : )


Friday, August 31, 2012

Wedded Bliss

Hi stampers!  It's been whirlwind of a summer and now it's time to settle into our fall schedule!
I'm long overdue in posting so I better get right to it:   I want to post a couple of cards I made for Jess, one of our stamp club members who got married recently.


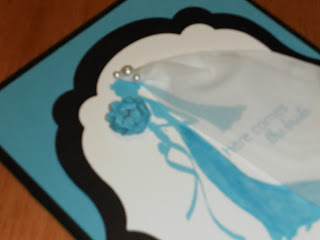
This is a retired stamp set but I love the silhouette profiles for different occasions.  This is one of those sets that I won't part with; retired or not.    The colors used are Tempting Turquoise (their official wedding color) and Basic Black.

 
I thought it would be fun to add a 'real' netting veil to this image and use some pearls to finish off the headpiece.  The bride's bouquet is a small flower made from the 'Itty Bitty' punch set, layered and scrunched.  The layered outline was created using the Labels Collection framelits for the Big Shot.
 
 
The card and matching envelope.
 
So that was the card I gave Jess for her bridal shower and below is the wedding card I gave the happy couple on their wedding day.
 

 Again, the colors were Tempting Turquoise and Basic Black.  I had some inspiration from other card creaters for this basic layout but changed a few details.  The black 'suit' is a full layer on the Tempting Turquoise layer with a v-shaped lapel cut out and a bow tie and buttons added.  The wedding dress is layered on top and finished with rows of pears.  I added another layered and scrunched flower for the groom's boutenier.   


If you look closely, the top and bottom of the dress is embossed with the Framed Tulips embossing folder.  Also, there is a rhinestone in the ring of the word 'do' like a wedding ring.

 
Here's the front and back of the matching envelope.
 
 
Jess and Ryan make a great couple.  We're all very happy for them!